From the simplest to the brightest human minds in the planet there has always been a struggle whether to believe if God exists or not. I'm not writing this piece to convince anybody to believe what I believe. For some reason, today I had this urge to write about the idea.
I don't go to church regularly. In fact I can't remember the last time I attended a service. I won't claim to be perfect or sinless or holier than anybody because I am certain I am not. But I do believe that there is God.
I haven't seen someone being risen from the dead but it won't stop me from believing in Him. My personal opinion is that everyday is a miracle. I don't know how the different parts of my body works but what I know is that I am alive. I consider this alone as a miracle. I also do not know why I was born into this world. It is not my idea to exist but here I am. If the beginning is not so clear the end is also the same. Some people because of their intelligence refuse to believe that there is God. I don't know if it is their understanding of their own existence that lead them to the idea. I think only God can explain why we are here. The purpose of each one of us existence' he knows for sure. To be born in this world live a few years and then die later won't make any sense. This applies to all of us however great or small.
I believe only God can put some real sense into a man's existence.
Thursday, August 23, 2012
Friday, July 20, 2012
Honda Bravo After 3 Years
I skipped the 2nd year review of my Honda Bravo which is enough reason for me to write its 3rd year review.
Brakes and Suspension
The puny little bike is now sporting a front disc brake for more stopping power. Although it will be much better for me not to ride too fast, I don't think I would be able to overcome the habit. Prior to the conversion, I've changed the front and rear brake shoes once.
Disc brake caliper requires mounting holes on the fork and so I bought a 2nd hand set that came from a China bike. Took me some time before I was able to tune the suspension. Rear damping is still stock.
Rims and Tires
It is still the same wheel size 1.4 x 17 front and 1.6 x 17 rear but the tires are now back to stock. I found out that the bike consume more gas on thicker (rear) tires. So it is 2.25 x 17 front and 2.5 x 17 rear for the rubbers.
Electricals
I am using OSRAM 35W bulb which costs around 200Php in my area. It is well worth the money. I've changed the headlight socket several times, though. I don't know where these stuffs are coming from because they break quite easily.
I have also converted the panel light to LED (DC) . Stock was a peanut bulb driven by the alternator (AC.) It is only a single bulb by the way the lights the whole thing up. The tail light voltage has been rectified for future conversion to LED.
The battery is still stock. Kudos to Honda for qualifying a component like this in their MCs and Yuasa for providing such an excellent product. Can you imagine 3 years and I am still able to use the push start button!!
Engine
I can see some dark spots in the cylinder block indicating oil leakage. I am not worried as long as the concrete where the motorcycle sleeps is dry of oil which is the case so far. I've changed the engine and rear sprockets several times to experiment speed and acceleration. Right now it is back to 14/36 stock. Drive chain has been replaced once being too noisy to DID 428.
For three years, this little motorcycle has proven its worth over and over again. Reliability is simply bulletproof. Maintenance cost is minimum while gas consumption is frugal. Still gets 45-55 km/L depending on how I ride it but 50km/L average isn't something to complain about.
Additional Mods
1. Honda Wave 100R OEM shocks - much better ( P500 2nd hand )
2. Honda Wave pillion foot rests. - stock foot rest sawed off ( P500 2nd hand )
3. Honda XRM 110 exhaust pipe - thicker sound ( P1k 2nd hand )
4. 53mm block - more torque ( P1.6k + P200 shipping )
5. TMX 155 carburetor - ( P2k )
Honda Bravo After A Year
 |
| As of August, 2012 |
Brakes and Suspension
The puny little bike is now sporting a front disc brake for more stopping power. Although it will be much better for me not to ride too fast, I don't think I would be able to overcome the habit. Prior to the conversion, I've changed the front and rear brake shoes once.
Disc brake caliper requires mounting holes on the fork and so I bought a 2nd hand set that came from a China bike. Took me some time before I was able to tune the suspension. Rear damping is still stock.
Rims and Tires
It is still the same wheel size 1.4 x 17 front and 1.6 x 17 rear but the tires are now back to stock. I found out that the bike consume more gas on thicker (rear) tires. So it is 2.25 x 17 front and 2.5 x 17 rear for the rubbers.
Electricals
I am using OSRAM 35W bulb which costs around 200Php in my area. It is well worth the money. I've changed the headlight socket several times, though. I don't know where these stuffs are coming from because they break quite easily.
I have also converted the panel light to LED (DC) . Stock was a peanut bulb driven by the alternator (AC.) It is only a single bulb by the way the lights the whole thing up. The tail light voltage has been rectified for future conversion to LED.
The battery is still stock. Kudos to Honda for qualifying a component like this in their MCs and Yuasa for providing such an excellent product. Can you imagine 3 years and I am still able to use the push start button!!
Engine
I can see some dark spots in the cylinder block indicating oil leakage. I am not worried as long as the concrete where the motorcycle sleeps is dry of oil which is the case so far. I've changed the engine and rear sprockets several times to experiment speed and acceleration. Right now it is back to 14/36 stock. Drive chain has been replaced once being too noisy to DID 428.
For three years, this little motorcycle has proven its worth over and over again. Reliability is simply bulletproof. Maintenance cost is minimum while gas consumption is frugal. Still gets 45-55 km/L depending on how I ride it but 50km/L average isn't something to complain about.
Additional Mods
1. Honda Wave 100R OEM shocks - much better ( P500 2nd hand )
2. Honda Wave pillion foot rests. - stock foot rest sawed off ( P500 2nd hand )
3. Honda XRM 110 exhaust pipe - thicker sound ( P1k 2nd hand )
4. 53mm block - more torque ( P1.6k + P200 shipping )
5. TMX 155 carburetor - ( P2k )
 |
| As of September, 2012 |
Honda Bravo After A Year
Tuesday, July 17, 2012
Honda Bravo Fork Oil Replacement (1)
I had an unfortunate accident back in 2009 that resulted to a sprained wrist and bent motorcycle forks. That time I have no idea about repairs so instead of buying replacement forks, I had the fork tubes removed from the sliders to have it straightened in a local machine shop.


After they are nice and straight, the fork is then reassembled. The mechanic used 2T oil instead of fork which is not a good idea. The problem really is, here in the Philppines, it is quite hard to get fork oil for some reason. Mechanics and DIYers have to make do with what is readily available with disappointing results. If I remember correctly, the 2T oil lasted only a few hundred kilometers before it started to leak. Also the ride quality is not so good being on the harsher side. I thought back then that I can fix the problem by tuning it.
I did some research in the internet and came to the conclusion that perhaps the mechanic put so much oil into the fork. In the days and weeks that followed, I experimented with different amounts of 2T oil, 50mL, 60ml...so on but I was never happy. So I ditch 2T oil and then searched for alternatives.
I found out that some people are using ATF instead. Same experiments repeated again with disappointing results. I then headed to Caloocan city which is probably the motorcycle parts and supplies capital of the Philippines.


I was able to find a shop that sells fork oil but only after trying a number of other shops. That oil is really hard to find, indeed! I bought a 500ml bottle of Repsol Horquillas in a Suzuki dealer store.
The performance is really different from the previous fluids I've tried. I know I'm no expert but it felt like nothing happened to the forks because it feels like stock.
Lately, I converted the front drum to disc brakes. No choice but to replace the front forks with the type that can hold a disc brake caliper. I was able to find a used one from an internet seller. Although it is not a Honda original, it was a plug and play affair when I tried it on my Bravo. It didn't take long before I decided that I would re-tune the suspension.
I found that it was 2T oil that was inside forks because of the smell. Not only that, it was lot of oil that was poured into the tube which explains the harsh ride. The problem is, the old Repsol which I bought earlier has been used up. Fortunately, after scouring a city and 3 towns, I was able to find a shop that sells Phoenix fork oil in Sto. Tomas, Batangas.
After some trial and error, I settled with 70mL on each leg.
Tuesday, July 10, 2012
Disc Brake Conversion Cost
Some pricing information for those who would like to convert their front brakes from drum to disc. I'm just curious if anybody would want to do it the other way around. :D
Originally Posted by win_26 ( from MCP )
Breakdown ng Parts/Prices nung nagdisc brakes ako:
Front Shock Housing - P800.00 (Mcp Classifieds)
Wave 125 Disc Rotor and Rims - P1300.00 (Mcp Classifieds)
Xrm Nissin Master to Caliper -P2200.00 (Mcp Classifieds)
Wave 125 Caliper Bracket -P 189.00 (Honda)
Wave 125 Speedometer Assy -P 540.00 (Honda JT)
Wave 125 Bearings, Dust Cover, Collars, Speedometer Retainer - P 777.00 (Honda)
Wave 125 Hub Bolts - Wala ako idea kasi free lang bigay ng mechanic ko.
P5806.00 Total Cost (Wala pa yung labor parts pa lang)
I chose honda parts over yung nabibili sa shops since i want to make it look oem on my wave alpha.
Eto na naman yung quote ng TriumpJT for Master to Caliper
Brake Master - P2745.00
Cylinder Master - P2080.00
Disc Rotor - P1240.00
Hose - P 730.00
Goodluck. In my opinion, its worth it kahit sinasabi ng iba pricey. Pero safety is the no. 1 priority kaya i think of it as an investment.
Below is the breakdown for my own conversion. Note that Honda Wave specially the 100cc series have a lot in common with Honda Bravo.
24 high tensile bolts - to fix the caliper, from a screw and nuts shop in Lipa
250 front fender - from a shop in Lipa
200 fender brackets - same shop as above
??? disc brake pads - from a shop in Lipa, fits XRM and Wave
100 speedometer cable - from a shop in our town, for Honda C100 model
40 side mirror thread adapter - from a shop in Lipa
??? brake light switch - same shop where I bought the thread adapter
1000 - front forks - from an internet seller in Laguna, for a China bike not sure which model
2800 nissin brake set with master, caliper, lever, hub, tire rim, spokes, rotor disc, wheel speed sensor - from an internet seller in Manila, for a China bike not sure which model
It is around 4k PhP for my conversion. I hope to get some money back if I am able to sell the stock parts just lying around in the storage.
Related Post
Honda Bravo Front Disc Brake Conversion
Tuesday, June 26, 2012
Honda Bravo Front Disc Brake Conversion
Several months of study, planning and search for parts finally paid off. My puny but trusty Bravo is now sporting a disc brake in its front. Well, the conversion isn't really complete at the moment but it is more on the aesthetics that needs to be ironed out. But functional, yes it is and it is like a new found freedom brought about by more stopping power provided by the new equipment.


Here's a list of parts that I bought for the conversion
1.) disc brake system (master, caliper, ABS, disc, hose, lever) - i got these items from an internet seller. The master and caliper were both Nissin brand. Dunno about the ABS which is like a small shiny canister between the hose and caliper. Hose needs to be replaced because of cracks. Lever also needs to be sanded and repainted to make it look good. Disc is Ok which is good news.
2.) wheel set - 1.4 x 17 rims with hub and bearings also from the same internet seller. I've got some spare tires, took one and it fitted perfectly on the rim.
3.) speedometer sensor - not sure if this is the correct name but it is the thing that attaches to the hub and where one end of the speedometer cable is also connected.
4.) brake light switch - it was missing in the brake master. It's a safety feature and therefore a must!
5.) bolts and washers - so that the brake caliper can be mounted on the fork.
6.) fork assembly - I bought this from another internet seller. He used it in his own conversion but he eventually sold the the bike with the original forks. I guess from a China bike because it is quite different. Also not a Showa brand.
7.) speedometer cable - the original one for Bravo won't fit.
8.) side mirror thread adapter - the master caliper that also holds the right side mirror has a small hole. The stock mirror's threaded end is a little bit larger. I was thinking of having it rebored or rethreaded and the adapter is quite a lucky find.
9.) disc pads
10.) front fender - it is cheap, the old one won't fit because of the hole placements.
11.) retaining clips or brackets - this is for the front fender. This thing clamps on the fork slider and holds the fender in place.
10.) front fender - it is cheap, the old one won't fit because of the hole placements.
11.) retaining clips or brackets - this is for the front fender. This thing clamps on the fork slider and holds the fender in place.
Whoa!!! I didn't realize that I bought all of those items above. Cash spent is about 4k Php. To recover some amount, I am thinking of selling the parts I removed from the bike.
Things to do :
1.) fix the handle bar - i sawed the metal that holds the right side mirror to give way for the brake master. Some grinding, filing, sanding and painting will be required.
2.) brake system overhaul - i have this feeling the brake is quite sticky. Some parts might be stuck.
3.) replace that brake hose
4.) tune the front forks - i am in the process of doing this at the moment. I found out that the ride is too harsh specially for an old man's back.
Related posts:
Monday, May 28, 2012
2012 Motorally
I was given this once in a lifetime chance to join the first ever Motorally last January 14, 2012. The invite came via Richard aka YBR1. He thought I am worthy enough to participate after joining the last two Manila-Matnog-Manila in 24hrs events. I wonder if he is reading this but I'd like to express my gratitude to him, nevertheless.
The ride will cover total of 1000 miles or roughly 1600 kilometers passing through several provinces of Northern Luzon as shown below.
 |
| 2012 Motorally Route |
 |
| Bravo and Me in Aparri |
Sunday, May 20, 2012
Log Periodic Antenna (2)
Part 2 (2011)
The objective actually was to have Channel 5 watchable since I am quite certain that Channel 2 and Channel 7 would still be clear even if I screw up with the antenna construction. I believe they have stronger transmission power compared to the other channels and besides, we still have the relayed channels which is very near (about 20-30 kms.) Unfortunately though, the towers are in the opposite direction ( south )
Continued in 2012
Today is May 21, 2012 and I can't remember when I wrote the above paragraph. Obviously, it has been a long time. In the spirit of trying to finish all unfinished posts, I'm gonna write the continuation today without pictures. Later on, I'm planning to review everything.
After several typhoons, the antenna is in a very bad state. Instead of being parallel to the ground, the front points downward. The channels from Manila are all gone suggesting a disconnect somewhere. We can only watch the relayed channels but even if the transmissions tower are nearer, the reception is still not good.
May 20, 2012, I got up early to fix the antenna. It is better to do this in the morning while it is not too hot. Rainy weather is coming and there's rain usually in the the afternoon.
I used magnet wire to connect the element for the simple reason that is quite easy to route. I know then that it was not proper way because I read somewhere that the thickness of the wire used as link affects the overall gain. The magnet wire was replaced with steel cable.
While removing the outer cover of the coaxial cable, I noticed that the insulator broke. About 0.25cm of plastic has separated itself from the rest. It seems like the insulator became brittle over time. I proceeded anyway and connected the cable to the antenna.
I pointed it North (Manila). Now the antenna is back in business with very clear receptions for stronger channels 2 and 7. Channels 4, 9, 11 are watchable although a bit noisy. There were also some UHF channels. But channel 5 which is why started this project is still a letdown with streaks that seem to flow from top to bottom. I wonder if it is caused by a mismatch or simply because the signal is just too weak.
Unable to fix the problem using the TVs fine tuning, I tried to find the optimum direction to point the antenna's front end. I used the coconut tree as the reference but I guess the tolerance is wide. The problem didn't go away. I was now beginning to suspect that something is amiss with the cable..
Fortunately, I have a spare coaxial cable. It is bit shorter compared to the one that is currently installed After making the connections, it is now confirmed that the old cable must be replaced. Channel 5 streaks are now gone and although there is some noise present in the picture which appears as white dots, this is way better and doesn't hurt the eyes as much.
Wednesday, May 16, 2012
Pacquiao and Gay Marriage
Some people overreacted when PacMan made a comment and said that he doesn't agree with gays getting married. What they missed is that he also said that they should be loved irregardless of their sexual orientation.
If the reference is the Bible, for sure it doesn't allow this kind of union. Pacquiao believes in It and it is therefore expected for him to echo what is written in the Book. But denouncing the gay community, I think he did not.
God made us individuals with freedom to choose and decide what to do. But He also prepared for us some guidelines on how we should live our lives. I myself will not condemn anyone simply because I don't have the right. I am far from being perfect and has committed violations against His rules.
But I believe that there is life after death and we will all be accountable to our deeds. God will be the judge and the Bible will be the reference.
Wednesday, May 2, 2012
Shopping For a New Ride
After my crash during the Manila-Matnog-Manila in November of 2011, I decided that I should get another motorcycle. I travel more than 40kms one way on a daily basis during weekdays and it is too much of a hassle for me to use the public transportation. Because of this aversion, I insisted on using my crash damaged Honda Bravo until the steering stem became a two piece part (luckily while parking the motorcycle.) It could have been worse, I know.
The motorcycle market in the Philippines has changed for the better. Several years ago, the choices are very limited if you're out on a lookout for a new ride especially if you're on a budget. It is either the underbones or the 'pantra' which are the business types that will eventually be attached to a sidecar for hauling more cargo and people. Now aside from the Japanese Big 4 we've got Chinese and Indian brands even Malaysian offering a variety..... from scooters to tourers. It therefore makes sense to formulate a criteria to aid in the selection process. I have the outline below.
Cost
I am a poor guy with a limited budget and although I'd like to have a powerful motorcycle I don't have that much moolah to burn. Based on my evaluation, I can only afford to throw away about Php 60k for a new bike. My dream motorcycles by the way cost 100-150k. But even before buying the bike, I have this idea of selling it after a year perhaps. The cash will be then used to fund the purchase of my dream ride.
Power
I used to have a Honda Wave 125 and although it is more powerful than my Bravo I want my next bike to be something that is more powerful. The Bravo cruises at about 80kph and could probably go up to 90kph but stability is a big concern. I want something that can cruise happily at 100kph. Top speed doesn't really matter but I'd be happy if it can go beyond 110kph.
Reliability
This is one of the characteristics that is a bit tough to estimate. In this case you can't help but rely on the experiences of those who bought the bike and took to time write a review. I spent a great deal of time lurking on internet forums digesting the feedback. I've also asked and observed the actual users and my area.
Efficiency
I have a car and although it is quite frugal, my choice of transport is still the motorcycle because it is even more frugal. My next ride should not get anything lower than 40km/L.
Looks
I am more a "function over form" guy and I don't really care if my bike looks ugly. For as long as it is clean and does what I'd like it to do, I am happy. But I wouldn't mind if my new bike will turn out to be an catcher. Also, I don't want another underbone and I'm leaning towards a standard bike design (referred as backbone types in some literature.)
There you go. I know that this may not be the most complete list but it should guide me and probably another in choosing his/her next bike.
Good luck and happy hunting to us.
Tuesday, February 21, 2012
Wednesday, February 15, 2012
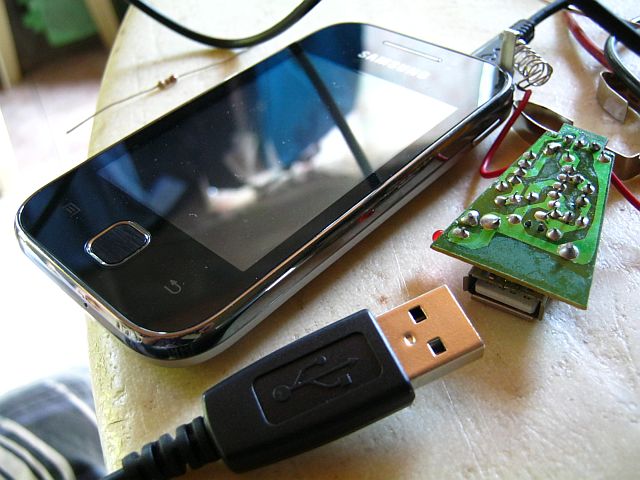
Samsung Galaxy Y Charger Hack
My old and trusty Magellan GPS is due for retirement. The rubberized cover is now starting to peel off. One-third of the LCD display is busted due to a fall while travelling at about 80kph. I used it mainly for tracking back my traveled path and also as an alternative speedometer..etc. It is really a bare unit with only the basic map installed. I just used my imagination to make the most out of the gadget.
Recently, I was given this Android phone called Samsung Y with built in GPS. And so now, the Samsung Y can now replace the old Magellan.
There's a problem though. When the GPS sensor is ON, and off course some navigation applications need to be active as well, the phone battery lasts only for some hours. The logical step therefore is to find a way to extend battery life or have a charger always connected. The phone charges via USB, by the way
I bought a CDR King 12V to USB charger for less than 100php (for those residing outside the Philippines, CDR King is a well-known shop selling electronics and computer stuffs.) Sure, it charges the phone but only when it is OFF. Once the phone is turned on, charging stops. This is unacceptable. How can I use the phone's GPS function if it is turned off?
Some hacking will be required. Before proceeding, please read my warning below.
DISCLAIMER : IF YOU DECIDE TO REPLICATE THIS MODIFICATION, I WON'T BE LIABLE TO ANY DAMAGE THAT IT MIGHT CAUSE. DO THIS AT YOUR OWN RISK.
 After opening the casing of the charger, I noticed that the two middle pins of the USB connector are just floating. I took a 10k resistor from my parts box and used it to short the two floating pins one by one to either GND or +5V. The phone still won't charge.

I took another 10k resistor and shorted both floating pins to GND. The phone beeped and the charging icon came up.
Soldering finalized the hack.

This is the intended application.

It looks like more effort will be needed but at least the phone now charges while it is turned ON!!!

Recently, I was given this Android phone called Samsung Y with built in GPS. And so now, the Samsung Y can now replace the old Magellan.
There's a problem though. When the GPS sensor is ON, and off course some navigation applications need to be active as well, the phone battery lasts only for some hours. The logical step therefore is to find a way to extend battery life or have a charger always connected. The phone charges via USB, by the way
I bought a CDR King 12V to USB charger for less than 100php (for those residing outside the Philippines, CDR King is a well-known shop selling electronics and computer stuffs.) Sure, it charges the phone but only when it is OFF. Once the phone is turned on, charging stops. This is unacceptable. How can I use the phone's GPS function if it is turned off?
Some hacking will be required. Before proceeding, please read my warning below.
DISCLAIMER : IF YOU DECIDE TO REPLICATE THIS MODIFICATION, I WON'T BE LIABLE TO ANY DAMAGE THAT IT MIGHT CAUSE. DO THIS AT YOUR OWN RISK.

I took another 10k resistor and shorted both floating pins to GND. The phone beeped and the charging icon came up.
Soldering finalized the hack.

This is the intended application.


Wednesday, February 8, 2012
Bravo R conversion (2)
After the research and armed with valuable information mostly gathered from the PBRC forums, the next logical step is to decide which way to go. There are actually several options on how the conversion task can be accomplished. Of course it really depends on how deep someone's pocket is.
NOTE : Pictures are not mine so credits goes to their respective owners.

Too help me with the decision, I divided the parts needed into two groups, required and optional.
Handlebar -- required
The original Honda Bravo handlebar just slides into the exposed portion of the steering stem. Just align the holes in both the handlebar and steering stem, insert the bolt into the aligned holes and then secure it with a nut on the other end. XRM or Raider style handle bars are clip-on types which can be attached at the end of the fork tubes.
Fork Bridge -- required
Locally, this is known as the butterfly. Machine shop service is needed depending on which motorcycle it was originally designed. From what I've read so far, if it is an XRM part, the hole where the steering stem goes through needs to be enlarged. With Raider and Motorstar MSX, no need because it just slides in nicely.
Fork tubes -- required
The original ones attached will have to be replaced with longer ones.
Fork sliders -- required
At least three options are available for this part and also depends whether if you want disc brake or not. By the way, this part is as known as the fork covers locally. The original sliders can still be used but it needs to be dismantled and the tubes removed. As mentioned above, the longer fork tubes will be used instead. This also means that front stopping will still be employing the drum brake.
Another option is to buy fork sliders designed for Honda Wave100R which is disc brake ready. More parts will have to be bought if this will be the choice.
The third one is to buy XRM forks which are also disc brake ready. My only concern with this option is that it is a different design and might affect the motorcycle's handling. With XRM fork, the front wheel axle bolt is located at the end of the fork itself. If a line is drawn from the fork tube to the axle bolt head/nut, the line will pass through both. Wave100 and Bravo forks on the other hand has the axle bolt placed slightly forward.
Disc brake -- optional
A whole kit with all the necessary parts can be bought. Make sure that the forks are ready as discussed above. The wheel hub will need to be changed as well to accommodate the disc. Some parts inside the wheel hub but related to the speedometer will be needed as well.

Front wheel fender -- required
The original can be retained if the stock fork sliders will be used. Not sure if the same is true with the other options but I've seen fenders for Wave100 with clips and they looked really different compared to stock.

Steering stem -- optional
Can be replaced with the one that comes from an XRM. There were reported issues about the bearings and turn radius.
I'm on a tight budget and the most likely choice for me obviously is the cheapest option. Keep as much stock parts as possible so I don't have to buy a lot of parts. I think I would just retain the drum brake. Now the hunt for parts begins....
Good luck to me!
Part 1
NOTE : Pictures are not mine so credits goes to their respective owners.
Too help me with the decision, I divided the parts needed into two groups, required and optional.
Handlebar -- required
The original Honda Bravo handlebar just slides into the exposed portion of the steering stem. Just align the holes in both the handlebar and steering stem, insert the bolt into the aligned holes and then secure it with a nut on the other end. XRM or Raider style handle bars are clip-on types which can be attached at the end of the fork tubes.
Fork Bridge -- required
Locally, this is known as the butterfly. Machine shop service is needed depending on which motorcycle it was originally designed. From what I've read so far, if it is an XRM part, the hole where the steering stem goes through needs to be enlarged. With Raider and Motorstar MSX, no need because it just slides in nicely.
Fork tubes -- required
The original ones attached will have to be replaced with longer ones.
Fork sliders -- required
At least three options are available for this part and also depends whether if you want disc brake or not. By the way, this part is as known as the fork covers locally. The original sliders can still be used but it needs to be dismantled and the tubes removed. As mentioned above, the longer fork tubes will be used instead. This also means that front stopping will still be employing the drum brake.
Another option is to buy fork sliders designed for Honda Wave100R which is disc brake ready. More parts will have to be bought if this will be the choice.
The third one is to buy XRM forks which are also disc brake ready. My only concern with this option is that it is a different design and might affect the motorcycle's handling. With XRM fork, the front wheel axle bolt is located at the end of the fork itself. If a line is drawn from the fork tube to the axle bolt head/nut, the line will pass through both. Wave100 and Bravo forks on the other hand has the axle bolt placed slightly forward.
Disc brake -- optional
 |
| XRM type fork sliders |
Front wheel fender -- required
The original can be retained if the stock fork sliders will be used. Not sure if the same is true with the other options but I've seen fenders for Wave100 with clips and they looked really different compared to stock.
 |
| Probably Bravo or Wave 100 fork sliders |
Steering stem -- optional
Can be replaced with the one that comes from an XRM. There were reported issues about the bearings and turn radius.
I'm on a tight budget and the most likely choice for me obviously is the cheapest option. Keep as much stock parts as possible so I don't have to buy a lot of parts. I think I would just retain the drum brake. Now the hunt for parts begins....
Good luck to me!
Part 1
Bravo R conversion (1)
My 2009 Honda Bravo now has 72,000++ kms in the odometer and although I am hopeful that it is not yet nearing its end-of-life, it could happen anytime. Since it will be dead anyway, I thought now is the best time to do some experiments and learn something out of the experience.
One of the projects although not really a priority is doing the BravoR conversion. In this particular conversion, the odd looking handlebar will be gone and will be replaced by a more normal looking steering parts.
At the moment, I am in research mode and fortunately, the guys at PBRC did a good job in documenting the process. Below are some notable excerpts from the PBRC website regarding Bravo R conversion.
http://hondabravo.webs.com/apps/forums/topics/show/2747347-honda-bravo-r-conversion?page=1

From aouei
Sa mga boszing natin jan na gustong magkaroon ng idea kuna magkanu at paano nabuo ang Honda Bravo-R conversion, subukan natin i discuss dito ang mga duguang bulsa at nabawas na taba ng utak natin para lang maisabuhay ang pangarap nating
"Honda Bravo-R".
Nagse-search ako sa internet dati para maghanap lang ng araro o engine cover para sa Bravo ko, (one of a kind kasi kaya hirap maghanap) dun ko nadiscover na merun palang yahoo groups exclusively for Honda Bravo user, nag search pa ako ng ibang site, napadpad naman ako sa blogg ni sir cool ( Arlan ), pagkatapos ng ilang araw na pagse-search ko nakita ko ung Hondabravo.ning.com (rest in peace) na web site. nagtry ako magbasa-basa ng mga thread at magbrowse ng mga pics.. dami ko nakitang mods, may mag asteeg, may mga simple lang, peru ang hindi naalis sa utak ko ay ang modz ni K.R.U.G.A.
1. XRM Telescopic
2. Baso ng wave
3. DIsk brake
4. Butterfly (raider)
5. Handle Bar (raider)
6. Master Caliper
7. Duguang Bulsa
yan ung mga binili ko para magaya ko ung modz ni K.R.U.G.A. but as of now, one of a kind pa din ang MC ni Elias (real name ni K.R.U.G.A.) halos hindi ko pa nakukuha kahit kalahati ng modz ni elias, peru kahit papanu pwede ko pa din sabihin na one of kind pa din ang Bravo ko dito sa Manila, sa pagkaka alam ito pa lang ang merun ganitong modz (correct me if Im wrong)
1. K.R.U.G.A - Cavite
2. Erwin - Tarlac
3. Nel - Tarlac
4. Mhelz - Pampanga
5. Bry - Cavite
6. Randy - Tarlac
7. Aouei - Manila (nag iisa sa manila ??)
Sa mga future newbies natin na gusto maging Bravo-R pwede nilang basahin ang thread na ito.
Sa mga nasa listahan ko sana makapag share din kau ng experience, comments and suggestion regarding sa napili nating Modz.
Thank's
-----
-----
From Randy
wew, dami narin pala naka BRAVO-R d2... d2 samin sa angeles one of a kind ung akin heheheh... ung convertions ko weh masasabi ko medyo mura... e2 prices nila
1.telescopic shock (xrm) - 950
2.butterfly - 320
3.t-post - 320
4.handle bar - 350
5.labor - 300
lahat yan brand new... medyo madali nlng kc ung convertion nung akin kc ngpadisc brake dati pa.. un lang po... tnx.. ride safe and GOD bless u all..
-----
From Nel
mga Sir, pde po hindi ka magdisc sa harap tulad ng sa mods ko, stock baso din ginamit pinalit lng telescopic pang XRM at stock t-post pa din kc gusto ko matibay xa kya di ko pinagalaw. as of now, ibabalik ko ung stock telescopic ko na maiksi kya ang imomods ko ay ang butterfly ko, nale magpapasadya ako ng handle bar na may kabitan ng headlight pra sumunod pa din ang headlight ko at tatanggaling ko ung butterfly, ilalagay ko ang post handle bar ng mga bike at dun ko isasalpak ang handle bar ko, tulad ng mga ginagawa sa wave 100 at 125 na walang ulo ^^
----
From Aouei
handling..? same as stock.. pag xrm style medju limited ng konti ung pagliko mo since iba ung stopper ng bravo sa xrm kahit itanung niu pa sa mag nagpaconvert.. raider style..? no idea.. peru ung butterfly ko pang raider tpos pang xrm pati ung telescopic.. mas maghanda isabay na ung disk brake para isang gastusan nalang.. ang para mas safe din since disk brake na as front.. HIH
---
From Erwin_b2i
yung akin hindi naman limitado ang pagliko... ang ginamit ko ay stock t-post ng bravo... then yung ibabaw nya ay pinabawasan ng kaunti kasi mahaba at pinatorno para sa lalagyan ng malaking bolt na hahawak at lolock sa butterfly. hindi din sila swak kung gamit ay XRM butterfly (pero ito ang ginamit ko), kinailangan ko din sya ipatorno para papantay sa butas ng butterly at t-post na lalagyan ng telescopic fork... kaya yung stopper nya ay dati pa din.. yung stopper ng pagliko ay nasa t-post banda....
sa mga gumamit ng xrm t-post... itry nyo po i-compare ang poste ng stock sa poste ng nabibiling xrm t-post... mas maliit po ang sa xrm at mas mataba ng kaunti ang stock. which is, swak na swak yung stock sa chasis... kung ginamit nyo ay yung pang xrm, pansinin nyo po ang kung may aalog sa manibela nyo lalo na pag may lubak. kasi ang kumakapit lang po sa chasis nyo ay yung bearing.. kung yung bearing ay nabasag o kaya madislocate ang mga bolitas delikado po yun.
---
from Boyulo
mga idol... kaka convert ko palang bravo ko pero diko alam pano maitransfer yung susian sa may butterfly pang motorstar msx ang gamit ko, pwede pain pang mailock yung manibela pag itratransfer na yung susian? thnx mga idol...
----
from Erwin b2i
tungkol sa susian.. sa xrm na butterfly, meron pong circle slot para sa location ng susian kaya lang yung lock wala na po. yun ang hindi ko nagawan ng paraan. Instead, bumili ako ng U-lock na nilalagay ko sa front wheel, dun ko sinususi..
---
from Boyulo
wahahahaha.... natapus din conversion ko... front drum brake fitting nalang....
cost breakdown:
telescopic set: P1500
butterfly: P670
handle bar: P550
side mirror bracket R&L W/ brake lever: P275
butterfly torno: P300
labor: P250
Merienda: P100
transport: P120
beer: P200
for a total of: P3890
astig na sya mas gwapo na sa shogun pro ko... hehehe... tnx po sa mga idol ko...
sakto yan... pang motorstar yung crown/butterfly ko... sumakto nman sya sa fork... pag xrm crown/butterfly ang gamit mo sakto na mas konti pa ang gastos mo sa machine shop kasi torno lang ang paluluwangin para sakto sa top ng t-post mo... hope it helps... try mo i-review mga previous posts ng mga bossing natin para maliwanagan ka...
Continued on Part 2
Subscribe to:
Posts (Atom)