Alright!
So now the old truck's revived odometer reads 200,000+ kms which means I've contributed about 26k kms to its mileage. That is after more that a year of ownership. It could've been more if I didn't have to leave it parked for about a month because of electrical issues.
Late last year, the pickup developed leak problems on its power steering system. Quite unfortunate that the alternator is directly underneath the hydraulic pump and leaking fluid goes straight to it. A few days after losing steering power assist, the alternator quit as well. The first shop where I took it for repair rerouted the hydraulic lines but the O-ring used for the banjo bolt is undersized that I had to replace it myself just to stop the leak. As for the alternator, I needed to visit the electrical shop twice. First they replaced the winding and then later the IC regulator because it gave up as well. So much for leak issues.
The AC went off late 2016 too. There was some grinding sound and then no cold air coming out of the vents. I said good riddance! Turning AC ON anyway causes the pickup to overheat. But then when a vehicle has no AC, the windshield and windows has this tendency to accumulate moist and then visibility issues. Quite dangerous specially when it is raining and moreso during the night when there is glare from other vehicle's headlights. This month though hesitant, I had it repaired because of the coming rainy season. Cost me about 10k php. P3500 for the suplus 15C compressor to replace the fried old unit (no oil.) Filter/drier and expansion valve replaced as well with brand new parts. Moist issue is now gone but the overheating issue is back specially when sitting on traffic for a long time.
As an attempt to cure the overheating issue, I removed the radiator from the pickup last week. I know that there are a lot of bent/deformed cooling fins so I took some time to straighten them up hoping that it will help in improving the air flow passing though the radiator. I also put some spacers to bring the radiator closer to the cooling fan. Performance is still under observation. I noticed an improvement but my initial assessment is that the fix is not enough to completely eradicate the problem.
The DIY fixes I did for the lighting system seems to be holding up quite well. The only source of grief for several instances already was the central locking system because of the low quality wires that came with the aftermarket kit bought by the previous owner. The copper in these wires are thin and has the tendency to disintegrate causing poor, intermittent, and sometimes completely open connection. I've started buying quality wires to rectify the issue.
To make travels less boring, I installed an el-cheapo car stereo from Lazada. It is good enough. The pickup got two front speakers and only the left side is usable. Right side speaker has cracks on its driver and it sounds annoyingly terrible. Now at least I can listen to FM radio channels, play music via USB or Bluetooth, and even make hands free calls. How long this stereo will last is still a question but so far I'm enjoying it.
Lastly, although the old 4D56 workhorse is leaking engine oil, fuel consumption is almost consistent at 13km/L. I'm saving funds to have the timing belt replaced including the tensioner and oil seals to get rid of the leaks. ASAP!
A blogger and rider from the land of the Mangyans, writing about riding adventures, motorcycles, electronic circuits, renewable energy, earning money, experiments and comments about daily life and other issues. ( Also trying hard to write in English. )
Wednesday, July 12, 2017
Sunday, April 9, 2017
Parking blues
You have no complete control over the actions of other people. How you react reflects on what kind of person you are.
Early morning at the office parking lot, I saw a car parked diagonally. After parking Celver and out of curiosity I walked towards the car I saw earlier. I theorized it probably developed a mechanical issue and thought maybe I might be able to help.
It turned out that the car was trying to block a wrongly parked motorcycle's way out!
In retrospect, I should have told the driver to call security instead to look for the rider of motorcycle. Unfortunately, I didn't. My lame excuse is that I was rushing to beat the bundy clock.
I hope I can do better next time.
Friday, February 24, 2017
More on the Pilot Solar Power Setup
The panels are not secured and simply laid down flat on top of the roof. Good thing that the roof inclination is not very steep and no chance for the panels to slide down. I hope to attach them to railings before the typhoon season. I don't like the idea of putting them on the roof to be honest. I think I'm putting some stress on the roof and wood trusses underneath when I am up there working on the panels.
I was not using MC4 connectors in the pilot setup. What I did was to bend some of the strands of the #12 AWG wire enough to make contact with connectors that came with the panels. To secure the connection and as crude weather seal, I wrapped them with electrical tape. One pair of wire for each panel, therefore I've got 4 wires going down from the roof.
The PWM charge controller has three pair of terminals. One pair each for the PV, battery and load. Wires or cables are inserted on slots on one side of the controller. Inside the slots are metals to clamp to wires when the screws on top of the controller are tightened. The two #12awg from the PV fits nicely on those slots but making it three could be a challenge. As for the battery connection I used the common automotive two terminal connector as in the picture. I defined the terminal near the lock tab as the positive and used female one for all my batteries. This means the connector from the controller is a male. Nothing is connected on the load terminal of the controller on my initial setup.
The inverter is directly connected to the battery using the thick wires that came with it. Just plug and play as the wires has eye terminals on both ends and colored red and black. On the AC side, I made an extension with plugs on both ends. One side plugs into the AC output of the inverter while the other end plugs into one of those wall sockets inside the house. The next step is to open the breaker box to turn ON the house circuits the I want to be powered up.
Parts List
2x 100W solar panels
1x 30A PWM charge controller
1x 100Ah deep cycle battery
1x 1000W pure sine wave inverter
4x 5m #12 awg
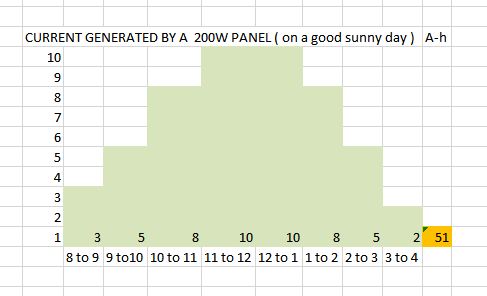
Calculated (sunny day) capacity = 200 * 0.5 * 6hrs = 600Whr
Calculated battery capacity = 100 * 50%DOD = 50Ah or 600Whr @ 12V
Total cost ~ 18,000 Php
Wednesday, February 8, 2017
My (pilot) Solar Power Setup
(Note : Ideas and calculations are all mine. If you will be setting up your own system based on what was written here, I take no responsibility for any failure. Not to discourage you or anything but mainly for safety since working on this stuff can burn your house or injure a person most likely to be you.)
Solar Panels
A 100W panel generates around 5A peak. In my setup, this occurs between 11:00AM to 1:00PM and at this time of the year. I actually have two units so it is 200W total capable of pushing 10A of current. As early as 7AM, the PVs generates about 1A rising gradually until it peaks around noontime. It is a downhil afterwards until it is back again to 1A at 4-5PM. If I have to estimate the number of hours when the panels generate power, it would be around 8 hours but with substantial current flowing in the inner 6 hours of this period. In my last post, I calculated the theoretical generated power of a 200W panel in a day which is about 600W-hr. I believe this is a good estimate based on my monitoring data.
The above information by the way is when the weather is good and sunny. Unfortunately, this is not always the case and it is the nature of weather to be somewhat fickle minded. I have some observation data but to make things very simple I have a rule of thumb that whenever it is cloudy, the generated power is 50% and 25% of the maximum when it rains. Therefore if it is cloudy the 600W-hr becomes 300W-hr and drops further to 150W-hr if it is rainy.
Charge Controller
Current measurements are taken from the LCD display of the 30A PWM charge controller. I am not sure about the absolute accuracy of the readings but I'd be happy if it is better than 10%. This is a cheap unit but is smart and it seems to do its job quite well. The seller warned me not to disconnect the battery while the panels are connected. I've violated this unintentionally a number of times and controller is still alive which makes this unit a sturdy one as well. Aside from the PV current, it also monitors the A-hr generated that I find handy.
Deep Cycle Battery
I bought a 100Ah battery for this off grid setup. This means I have around 600Whr of energy to spend while the sun is out. That is at 50% DOD and provided the battery was able to reach a full charge during the day. The only possible indication of this event is when the controller displays 14.5V for the battery voltage and the charging current cycles between zero and maximum or some value in between. This could mean that the PWM switching mode takes over to trickle charge the battery. On weekends when there is no office work, my observation is that at dawn the battery reaches a voltage of 13V+ which then goes down to an average of 12.2V the following morning. Less final voltage of course when the weather is not so good which is around 12.7V to 12.9V. There was only one morning when I saw it at 12V but was never less than this value.
Inverter
The inverter which I've been using for a month now is low cost (cheap) 1000W unit. It can drive our 8.5cuft refrigerator, 50inch LCD TV and even my electric drill. It complains when it is asked to power a grinder, though. But for LED bulbs, electric fans and charging gadgets, this is more than fine. The only gripe is the idle consumption which I estimate to be 10W. This is equivalent to 20Ah lost daily assuming the inverter is connected all the time. I hope this is not a fixed offset and drops to close to zero when a load a connected. I need to buy a wattmeter for confirmation.
Loads
As mentioned previously, my setup has been running for a month now. At the moment, the refrigerator is still unplugged and we failed to watch Miss Universe 2017. We are still in test drive mode while closely monitoring our consumption because we are completely off grid. No rice cooker and no ironing of clothes. Just bulbs for lighting, occasional electric fan, wifi router, diy stereo and gadgets charging.
... but NO electric bills to worry about.
Sunday, February 5, 2017
Solar Power Ideas
(Note that ideas expressed in this post are from my own understanding. More like brainstorming on the concept of an off grid system.)
INPUT
200W panel capacity for practical purposes is actually 100W. So that is 50% off the rated value. Based on Wikipedia, the Philippines gets an annual sunlight of 2,000 to 2,4000 hours. Choosing the mean of 2,200 hours we get therefore an average of about 6 hours sunlight daily. A 200W panel therefore can supply about 600W-hr of energy per day.
200W * 50% * 6hrs = 600W-hrs
STORAGE
Batteries rated capacities are specified in Ampere-hours (Ah). Therefore for a 100Ah battery with a load that draws 100A, it should be able to last for an hour. If the load is 50A, 2 hours...so on. I believe that is the ideal case with no losses and other factors. But draining the battery is not a good idea since it will shorten the usable life. 50% DOD or less is oftentimes recommended. DOD or depth of discharge is the amount of energy drawn from the battery. In the case of the 100Ah battery, instead of drawing 100A for an hour, we should should cut the time or the current to half to satisfy the 50% DOD criteria. The energy we can extract from the battery is 600W-hrs.
12V * 100Ah * 50% = 600W-hr
12V * 100Ah * 40% = 480W-hr ;if 40%DOD
*Learned this late, that batteries are normally 20hr rated. Therefore a 200Ah battery could supply about 5A for 20 hours.
OUTPUT and LOAD
Load calculation is quite tricky since there are factors that needs to be managed. Basically it is just the Time and Power but consumption is almost always varying for a 24 hour period. For example during the day when people are awake, they could be charging their gadgets, watch TV or playing on their PCs. During the night when there could be less human activity, perhaps one or two bulbs is ON or the electric fan is providing some needed cooling so that people are comfortable in their sleep. Therefore to be able to manage the available and stored energy, it is necessary to have an energy usage budget.
Ideally during the day, we should have enough power from the panels to keep our appliances and gadgets working while charging our batteries for night usage. If we draw more power than what the panels can supply, the battery is there to the rescue. But then remember this is the opposite of what we should be doing and if we are do this long enough such that the battery has no chance to charge, we end with no power left to consume during night.
At 40% DOD wherein we got 480W-hr available out of the 100Ah battery (that is assuming we have a full charge before nightfall) we can have a load of 48W from 6PM to 4AM the next day. Say we've got two LED bulbs of 9W each that is continuously ON the whole night, the battery has more than enough juice for this purpose. That is 18W from 6PM to 6AM is 216W-hr or less than half of the stored capacity at 40% DOD of the 100Ah battery :).
As an extreme example, if we watch a 100W TV from 6PM to 12PM, we consume 600W-hr and although the battery at that point could still be alive, we run the risk of over discharging it which is detrimental to its health.
I believe that knowing the amount of power available and having an energy budget and load management plan is a must specially on an off-grid solar power setup.
Tuesday, October 11, 2016
Goodbye to my Sentra B13
I just sold my B13 last Saturday, 8th of October, 2016.
I originally thought of selling lower than the amount I bought it but the missus insisted on selling it higher. Fine with me as long as she will be the one to negotiate. Surprisingly, she was able to pull the deal off.
That B13 though old is a good car. It is not perfect but it runs well. It rattles on some areas but at least not coming from underneath. Quite fuel efficient at 13km/L and cruises 100kph at less than 2.5k rpm. May the new owners enjoy the car as much as I did.
Unfortunately, we have to sell it because we are running out of parking space. The spot where it used to sleep is now occupied by a Suzuki hatchback.
Saturday, May 14, 2016
Nissan Sentra (B13)
Aside from the Mitsubishi L200, I have another vehicle which is also more than 2 decades old. In fact this one is 2 years older than the pickup. It is a Nissan Sentra 1992 model and it's been with me for a year now. I believe this is also called Series II here.
A little bit of background
I had a motorcycle accident around May 2015 wherein I was almost ran over by a van. Fortunately, I survived but I've been having lower back pains since then. For several weeks after the accident, it was such an ordeal. I can still ride my motorcycle though but I was in pain so I said to myself, why not try driving a car again? So I bought this car for a price that can pay for a 3-years-or-older 150cc motorcycle . Not a bad deal I guess.
This Sentra is powered by 1.6L GA16DE ECCS engine. It is a fuel injected mated to an automatic transmission. Aircon works and just like any other Nissan, it cools the cabin really well. This car gives me about 12km to a liter which is not bad for car of this displacement. At 100kph crusing speed, engine spools at about 2500rpm. Since this is an A/T car, I don't expect to win drag races. I'm happy driving sedately going from A to B while my left foot is doing nothing. The car has independent suspension on each wheel which I find nice specially on curves.
Being an old machine, issues are expected. Water leaks on top of the windshield on both driver and passenger sides. Carpets needs to be replaced as it smells oil and not so pleasing to look at. There is no stereo so I installed an el-cheapo but it retired after the first month. Found out that there was a lot of non-stock wiring for some reason. The trunk is also not in perfect alignment anymore. The car has overheating problems specially when running idle and even when running at high speed since it is required to operate at higher engine revs. One of the windows won't go down. It turned out that the motor is gone. Etc..etc.etc. At least the engine still cranks and the car runs. :)
What I've done so far
1.) Tidy up the wire jungle underneath the dashboard. There was a lot of unnecessary wirings possibly for remote entry and alarm which was just left there tapped to stock wirings.
2.) Went to a shop to have the radiator overhauled. Fabricated brackets for one of the fans. The fan is not stock and the blade is too close to the radiator.
3.) Rewired the cooling and auxillary fans such that it is now much closer to stock. Previously, it was tapped to fuel pump wirings such that as long as the pump is running, fans are running too. Makes sense but not not ideal.
4.) Tidy up the wirings in the engine bay.
5.) A/C wiring is now closer to when it was still stock.
I hope to keep this car for as long as I can. I'm actually thinking if this lasts three years, it is more than enough for what I paid for. One thing I'm quite happy about is that I'm learning a lot tinkering with this old buggy. I wish I have more time fixing stuffs and write about it on this blog.
Friday, April 22, 2016
L200 '94
I recently bought a 22-year old pickup truck. It is diesel fueled with 174k kms in the odometer. But since the previous owner didn't bother to replace the speedometer cable, the actual number will forever be a mystery. I have installed the replacement part therefore km counting can now continue.
What I've done so far
1.) As mentioned above, I've replaced the broken speedo cable. I had to crawl underneath the pickup. Though the label says it is for Strada which is of course the newer version of the truck, I had no issues installing the replacement.
2.) Revived the backing light circuit which was another crawling activity. The switch was still there but there were no wires. I had to clean the switch first with WD40 because it didn't work at first. The next part is tracing the wiring of the bulbs. Fortunately, the male connector is still there near the firewall so I just needed to attach the female at the end of the wires I added (from the switch).
3.) The truck has a lot of lighting issues, from brake lights to signal lights. Some of the sockets are actually corroded and there were errors in the wiring connections. My assumption is that previous owner must be trying to fix it but messed up so he just left it as it is out of frustration. I've fixed them because as a personal policy, all my vehicles should have a properly working lights system.
4.) I used to have problems starting the engine specially on mornings. I thought it was just because the glow plugs are old and needs to be replaced. It turned out that the wire going to the plugs is burned out. Based on what I've read, there is supposed to be smart circuit that should automate the process of preheating the cylinder. For some reason, someone added a manual switch to energize the plugs. Quite unfortunate that the wires are too thin for the application which lead to its demise. At least the relay still works and there was a fuse so I just had to replace the burned wire with a thicker gauge.
5.) I was heading home one night and noticed that the headlights were not as bright as the previous night. As I was nearing home, all dashboard lights went out and even the hazard light didn't work. Fortunately, the battery has enough juice to power the fuel cut solenoid and I was able to go home. Yes it was a battery problem because the alternator quit working. Brought it to a shop and the guy replace/rewind something in the alternator assembly. Three months since and no issues so far.
6.) There was a noticeable change in idling and acceleration whenever the temperature gauge reaches the halfway mark. Under the hood, the engine seems to running hotter than normal or when the gauge is at 1/4 mark for example. The needle also moves faster towards the red zone if I do a consistent 100kph on the expressway. I was thinking about the worst case because 4D56 is quite notoriously known for warped cylinder heads. Brought the pickup to a radiator shop one Saturday and personally saw how much gunk has accumulated inside the radiator. Added calibration of the gauge in the todo list.
7.) I was driving one day and for some reason the truck has this tendency to veer right. Checked the tires for uneven wear and yes there was on the front tire driver side. Brought it to a shop that specializes on underchassis. They replaced the lower bushing and machine press a component of the front suspension which I can't remember. Afterwards, they aligned the wheels. Now I have to visit them each month to have it checked as part of the 6-month warranty.
8.) Of course, there are other minor things which is to be expected for old vehicles like this one. Things such as tidying up the wirings, tightening the screws, checking the spare tire among other things.
This is my first time to own a diesel vehicle, also the first time to own a pickup and I'm enjoying it so far. To date, I've added more than 5k kms to its resurrected odometer.
Saturday, March 14, 2015
Kawasaki Bajaj Rouser 135LS ( aka Pulsar 135LS in India ) Part 2
I have another motorcycle which is an underbone. To justify the purchase, I was hoping that the Bajaj Rouser will be better than my Honda Bravo.
In terms of power, it is indeed more powerful. It pulls harder and 80kph is easily attainable. While the little bike's top speed is around 90kph, the Rouser cruises at this speed with no problem.
Braking is also more confident and I believe this has something to do with the chassis. Although the frame that comes with the Rouser may not be the best chassis design out there, it is way better than the underbone.
One aspect in which the underbone is probably marginally better is on curves. Note that this is very subjective. My theory is that the weight difference is coming into play since the Rouser is 25kgs heavier. Some people say that underbones are notoriously known for their excessive body roll but I find it easier to throw the UB bike on corners. But then as I mentioned earlier, it could be just me, the rider.
On the average, Rouser consumes 45km/L which is about 5km/L less than what I would normally get on the Bravo. But for the pull and speed that it is able to give it is not a big deal. Besides, in comparison to other brands with similar displacement it is at par if not better in terms of frugality.
Tires are MRFs which most users find slippery. I thought the same too but my front tire lasted for 50,000 kms. I replaced it only when the thread center line ran out. I remember we had a group ride wherein I was designated as the spear. We traveled a twisty mountain road while it was raining. I thought I was riding cautiously but when we had to stop some guys told me I was fast. And I was on stock front tire.
I believe the choice of tires has a huge effect on a bike's handling. I've tried replacing the rear MRF with FDR Genzi 100/80 and it felt more stable. But one good thing about the stock MRF is its durability. Front tire lasted for 3 years while the rear lasted for about 2 and a half years. I never had a flat on those tires.
Headlight is also good. Often times, motorists from the opposite lane would give me flashing signal perhaps thinking I was on high beam even though the headlight is on low. I also like the dual horns.
One thing which I haven't been able to figure out is the adjustment of the side mirrors. I'm not really a big guy and my shoulders are not that wide but it would cover half of the view on both mirrors.
Rouser Part 1
As of this writing, the odometer reads ~64,000 kms and 3+ years of owning the machine I will be trying to recall my experience with this bike from memory. This is the 2nd installment on the same topic and for the third and final post, I plan on writing about the problems encountered on this bike and maybe share the lessons learned.
Saturday, February 28, 2015
Honda Bravo After 5+ Years
Well, I have this motorcycle for five and a half years with no major problems. I was just doing regular maintenance which is basically changing oil every 2,000 kms and that's it. I don't even bother checking on the spark plug.
BRAKES AND SUSPENSION
On the front side, the Wave 100 forks are still attached. I remember replacing the fork oil at least twice but not on specific intervals. When I feel that the motorcycle dives too much, that's the time to do it.
Rear shocks has been replaced with those coming from XRM 125 for 1k php. I believe it is more durable compared to stock and it rides quite sporty (read : stiff.) It is also shorter by some mm so the Bravo is now "lowered" . Same brakes as in the last update but I've replaced the front pads one time. The disc rotor by the way is showing signs of pitting. Not sure if it is the proper term. Since I am using parts from another motorcyle, the pads and disc are not matched mechanically and the outer portion of the disc is not in contact with the padss. Therefore only the inside part is being worn out while that outside portion is not used up so it is thicker compared to the inside area.
RIMS AND TIRES
No changes in the rims but the tires are now 70/80 and 80/80 front-rear, respectively. It seems to to give the bike a more flickable feeling.
ELECTRICALS
The stock Yuasa finally gave up after 4 years. I replaced it with a gel type with some sort of battery health monitoring capability. Simply press the button and the corresponding LED lights up. You always want it to be green. Maybe orange is still fine but definitely you shouldn't want it in red.
Except for the tail lights which is still AC powered, the motorcycle is almost a full-DC system including the headlight which now sports an LED bulb. It was a pain to install because there is a fan and heat sink attached to this bulb and there was very little space inside the head light cowling. I had to relocate the horn just to be able to complete the installation.
ENGINE
I can see leaks in the cylinder head and on the valve covers but not that much and therefore I am not worried. My other motorcycle actually has a more serious leak problem. The Bravo still pulls OK and can achieve the same top speed. The current odometer reading is 27,000+ kms. Bear in mind that this is actually 127,000+ kms since the meter can only display up to 99,999kms. Yes, this motorcycle is getting old but it can still do 50kms to a liter.
Honda Bravo After 3 Years
Motorcycle Accidents
On a fateful evening of October last year (2009), I met an accident involving a jeepney.
I was traversing the National Highway with my wife at around 8PM. I was following a car perhaps about 3 to 4 cars length. The road by the way was a long straight and a slight downgrade. The car signaled that it was turning right so I slowed down a bit and moved to the left. All of sudden I saw the jeepney's front right after the car has completed its turn. It was coming from where the car is going and it was turning left. I don't know if the driver didn't look on the oncoming traffic or he was looking on the other lane. Probably he thought that it was only a car and never cared to look again.
Since the jeepney's front has completely blocked my lane and I am pretty sure that hard braking will not be enough, I steered the bike to the left while braking hard. Now I am on the opposite lane. But the f----g jeepney didn't stop. To make the story short, the bike's front wheel hit the jeepney's left front wheel. My head banged on the jeep's fender. I was pushed by the weight of my wife to the front and I felt pain on my left wrist. It started to swell after a few minutes.
I am not a violent person but I thought that it was the best time to have a gun on hand. The driver of the jeep acted as if we're at fault although he's the one who cut me off. I am supposed to have the right of way. He was telling me that since it was my motorcycle that hit his jeep, therefore I am at fault. As if I did it intentionally which is 180 degrees of what we usually call common sense.
Saturday, January 24, 2015
Kawasaki Bajaj Rouser 135LS ( aka Pulsar 135LS in India ) Part 1
Previously, I've posted about Honda CB110 because I was interested in buying one. That was in 2010. However, due to various reasons, that plan didn't materialize.
In November 2011, I crashed during that year's edition of the Manila-Matnog-Manila Endurance Challenge and I was forced to use the car for my daily commute since it was too risky to ride the Honda Bravo due to its damaged steering. That incident gave me an additional motivation to acquire another motorcycle. I love riding more than driving.
Although I've been eyeing the CB110, I am very concerned about its power ( or lack of it .) Sure I can rev it hard but this might shorten the engine lifespan. I knew that Kawasaki-Bajaj has been offering the Rouser locally -- first in 200cc and then 220cc (2010) later. Any of the two should be more than enough for may power craving. However, I am just a poor boy and I don't want to spend 100k php or so for my daily commuter. Aside from that, fuel consumption is a potential turn off as well.
Then came the Rouser 135:LS (end of 2010.) It was well received in the Philippines and it didn't take long before it became a common sight. However, it is plagued with issues with owners reporting a lot of problems on local motorcycle forums. In MCP which is probably the most popular, Rouser 135LS ' technical thread is probably the record holder for the most number of pages. Fortunately, there were dedicated users/forumers who shared their learnings on how they were able to tame their machines.
On December 2011, I decided to get one for myself. It was like a love and hate relationship.
Rouser 135LS Part 2
Tuesday, February 12, 2013
Motorcyling Myths!
http://www.motorcyclecruiser.com/streetsurvival/dangerous_motorcycle_safety_myths/
Thursday, August 23, 2012
The Concept of God
From the simplest to the brightest human minds in the planet there has always been a struggle whether to believe if God exists or not. I'm not writing this piece to convince anybody to believe what I believe. For some reason, today I had this urge to write about the idea.
I don't go to church regularly. In fact I can't remember the last time I attended a service. I won't claim to be perfect or sinless or holier than anybody because I am certain I am not. But I do believe that there is God.
I haven't seen someone being risen from the dead but it won't stop me from believing in Him. My personal opinion is that everyday is a miracle. I don't know how the different parts of my body works but what I know is that I am alive. I consider this alone as a miracle. I also do not know why I was born into this world. It is not my idea to exist but here I am. If the beginning is not so clear the end is also the same. Some people because of their intelligence refuse to believe that there is God. I don't know if it is their understanding of their own existence that lead them to the idea. I think only God can explain why we are here. The purpose of each one of us existence' he knows for sure. To be born in this world live a few years and then die later won't make any sense. This applies to all of us however great or small.
I believe only God can put some real sense into a man's existence.
Friday, July 20, 2012
Honda Bravo After 3 Years
I skipped the 2nd year review of my Honda Bravo which is enough reason for me to write its 3rd year review.
Brakes and Suspension
The puny little bike is now sporting a front disc brake for more stopping power. Although it will be much better for me not to ride too fast, I don't think I would be able to overcome the habit. Prior to the conversion, I've changed the front and rear brake shoes once.
Disc brake caliper requires mounting holes on the fork and so I bought a 2nd hand set that came from a China bike. Took me some time before I was able to tune the suspension. Rear damping is still stock.
Rims and Tires
It is still the same wheel size 1.4 x 17 front and 1.6 x 17 rear but the tires are now back to stock. I found out that the bike consume more gas on thicker (rear) tires. So it is 2.25 x 17 front and 2.5 x 17 rear for the rubbers.
Electricals
I am using OSRAM 35W bulb which costs around 200Php in my area. It is well worth the money. I've changed the headlight socket several times, though. I don't know where these stuffs are coming from because they break quite easily.
I have also converted the panel light to LED (DC) . Stock was a peanut bulb driven by the alternator (AC.) It is only a single bulb by the way the lights the whole thing up. The tail light voltage has been rectified for future conversion to LED.
The battery is still stock. Kudos to Honda for qualifying a component like this in their MCs and Yuasa for providing such an excellent product. Can you imagine 3 years and I am still able to use the push start button!!
Engine
I can see some dark spots in the cylinder block indicating oil leakage. I am not worried as long as the concrete where the motorcycle sleeps is dry of oil which is the case so far. I've changed the engine and rear sprockets several times to experiment speed and acceleration. Right now it is back to 14/36 stock. Drive chain has been replaced once being too noisy to DID 428.
For three years, this little motorcycle has proven its worth over and over again. Reliability is simply bulletproof. Maintenance cost is minimum while gas consumption is frugal. Still gets 45-55 km/L depending on how I ride it but 50km/L average isn't something to complain about.
Additional Mods
1. Honda Wave 100R OEM shocks - much better ( P500 2nd hand )
2. Honda Wave pillion foot rests. - stock foot rest sawed off ( P500 2nd hand )
3. Honda XRM 110 exhaust pipe - thicker sound ( P1k 2nd hand )
4. 53mm block - more torque ( P1.6k + P200 shipping )
5. TMX 155 carburetor - ( P2k )
Honda Bravo After A Year
![]() |
| As of August, 2012 |
Brakes and Suspension
The puny little bike is now sporting a front disc brake for more stopping power. Although it will be much better for me not to ride too fast, I don't think I would be able to overcome the habit. Prior to the conversion, I've changed the front and rear brake shoes once.
Disc brake caliper requires mounting holes on the fork and so I bought a 2nd hand set that came from a China bike. Took me some time before I was able to tune the suspension. Rear damping is still stock.
Rims and Tires
It is still the same wheel size 1.4 x 17 front and 1.6 x 17 rear but the tires are now back to stock. I found out that the bike consume more gas on thicker (rear) tires. So it is 2.25 x 17 front and 2.5 x 17 rear for the rubbers.
Electricals
I am using OSRAM 35W bulb which costs around 200Php in my area. It is well worth the money. I've changed the headlight socket several times, though. I don't know where these stuffs are coming from because they break quite easily.
I have also converted the panel light to LED (DC) . Stock was a peanut bulb driven by the alternator (AC.) It is only a single bulb by the way the lights the whole thing up. The tail light voltage has been rectified for future conversion to LED.
The battery is still stock. Kudos to Honda for qualifying a component like this in their MCs and Yuasa for providing such an excellent product. Can you imagine 3 years and I am still able to use the push start button!!
Engine
I can see some dark spots in the cylinder block indicating oil leakage. I am not worried as long as the concrete where the motorcycle sleeps is dry of oil which is the case so far. I've changed the engine and rear sprockets several times to experiment speed and acceleration. Right now it is back to 14/36 stock. Drive chain has been replaced once being too noisy to DID 428.
For three years, this little motorcycle has proven its worth over and over again. Reliability is simply bulletproof. Maintenance cost is minimum while gas consumption is frugal. Still gets 45-55 km/L depending on how I ride it but 50km/L average isn't something to complain about.
Additional Mods
1. Honda Wave 100R OEM shocks - much better ( P500 2nd hand )
2. Honda Wave pillion foot rests. - stock foot rest sawed off ( P500 2nd hand )
3. Honda XRM 110 exhaust pipe - thicker sound ( P1k 2nd hand )
4. 53mm block - more torque ( P1.6k + P200 shipping )
5. TMX 155 carburetor - ( P2k )
![]() |
| As of September, 2012 |
Honda Bravo After A Year
Tuesday, July 17, 2012
Honda Bravo Fork Oil Replacement (1)
I had an unfortunate accident back in 2009 that resulted to a sprained wrist and bent motorcycle forks. That time I have no idea about repairs so instead of buying replacement forks, I had the fork tubes removed from the sliders to have it straightened in a local machine shop.
After they are nice and straight, the fork is then reassembled. The mechanic used 2T oil instead of fork which is not a good idea. The problem really is, here in the Philppines, it is quite hard to get fork oil for some reason. Mechanics and DIYers have to make do with what is readily available with disappointing results. If I remember correctly, the 2T oil lasted only a few hundred kilometers before it started to leak. Also the ride quality is not so good being on the harsher side. I thought back then that I can fix the problem by tuning it.
I did some research in the internet and came to the conclusion that perhaps the mechanic put so much oil into the fork. In the days and weeks that followed, I experimented with different amounts of 2T oil, 50mL, 60ml...so on but I was never happy. So I ditch 2T oil and then searched for alternatives.
I found out that some people are using ATF instead. Same experiments repeated again with disappointing results. I then headed to Caloocan city which is probably the motorcycle parts and supplies capital of the Philippines.
I was able to find a shop that sells fork oil but only after trying a number of other shops. That oil is really hard to find, indeed! I bought a 500ml bottle of Repsol Horquillas in a Suzuki dealer store.
The performance is really different from the previous fluids I've tried. I know I'm no expert but it felt like nothing happened to the forks because it feels like stock.
Lately, I converted the front drum to disc brakes. No choice but to replace the front forks with the type that can hold a disc brake caliper. I was able to find a used one from an internet seller. Although it is not a Honda original, it was a plug and play affair when I tried it on my Bravo. It didn't take long before I decided that I would re-tune the suspension.
I found that it was 2T oil that was inside forks because of the smell. Not only that, it was lot of oil that was poured into the tube which explains the harsh ride. The problem is, the old Repsol which I bought earlier has been used up. Fortunately, after scouring a city and 3 towns, I was able to find a shop that sells Phoenix fork oil in Sto. Tomas, Batangas.
After some trial and error, I settled with 70mL on each leg.
Tuesday, July 10, 2012
Disc Brake Conversion Cost
Some pricing information for those who would like to convert their front brakes from drum to disc. I'm just curious if anybody would want to do it the other way around. :D
Originally Posted by win_26 ( from MCP )
Breakdown ng Parts/Prices nung nagdisc brakes ako:
Front Shock Housing - P800.00 (Mcp Classifieds)
Wave 125 Disc Rotor and Rims - P1300.00 (Mcp Classifieds)
Xrm Nissin Master to Caliper -P2200.00 (Mcp Classifieds)
Wave 125 Caliper Bracket -P 189.00 (Honda)
Wave 125 Speedometer Assy -P 540.00 (Honda JT)
Wave 125 Bearings, Dust Cover, Collars, Speedometer Retainer - P 777.00 (Honda)
Wave 125 Hub Bolts - Wala ako idea kasi free lang bigay ng mechanic ko.
P5806.00 Total Cost (Wala pa yung labor parts pa lang)
I chose honda parts over yung nabibili sa shops since i want to make it look oem on my wave alpha.
Eto na naman yung quote ng TriumpJT for Master to Caliper
Brake Master - P2745.00
Cylinder Master - P2080.00
Disc Rotor - P1240.00
Hose - P 730.00
Goodluck. In my opinion, its worth it kahit sinasabi ng iba pricey. Pero safety is the no. 1 priority kaya i think of it as an investment.
Below is the breakdown for my own conversion. Note that Honda Wave specially the 100cc series have a lot in common with Honda Bravo.
24 high tensile bolts - to fix the caliper, from a screw and nuts shop in Lipa
250 front fender - from a shop in Lipa
200 fender brackets - same shop as above
??? disc brake pads - from a shop in Lipa, fits XRM and Wave
100 speedometer cable - from a shop in our town, for Honda C100 model
40 side mirror thread adapter - from a shop in Lipa
??? brake light switch - same shop where I bought the thread adapter
1000 - front forks - from an internet seller in Laguna, for a China bike not sure which model
2800 nissin brake set with master, caliper, lever, hub, tire rim, spokes, rotor disc, wheel speed sensor - from an internet seller in Manila, for a China bike not sure which model
It is around 4k PhP for my conversion. I hope to get some money back if I am able to sell the stock parts just lying around in the storage.
Related Post
Honda Bravo Front Disc Brake Conversion
Tuesday, June 26, 2012
Honda Bravo Front Disc Brake Conversion
Several months of study, planning and search for parts finally paid off. My puny but trusty Bravo is now sporting a disc brake in its front. Well, the conversion isn't really complete at the moment but it is more on the aesthetics that needs to be ironed out. But functional, yes it is and it is like a new found freedom brought about by more stopping power provided by the new equipment.
Here's a list of parts that I bought for the conversion
1.) disc brake system (master, caliper, ABS, disc, hose, lever) - i got these items from an internet seller. The master and caliper were both Nissin brand. Dunno about the ABS which is like a small shiny canister between the hose and caliper. Hose needs to be replaced because of cracks. Lever also needs to be sanded and repainted to make it look good. Disc is Ok which is good news.
2.) wheel set - 1.4 x 17 rims with hub and bearings also from the same internet seller. I've got some spare tires, took one and it fitted perfectly on the rim.
3.) speedometer sensor - not sure if this is the correct name but it is the thing that attaches to the hub and where one end of the speedometer cable is also connected.
4.) brake light switch - it was missing in the brake master. It's a safety feature and therefore a must!
5.) bolts and washers - so that the brake caliper can be mounted on the fork.
6.) fork assembly - I bought this from another internet seller. He used it in his own conversion but he eventually sold the the bike with the original forks. I guess from a China bike because it is quite different. Also not a Showa brand.
7.) speedometer cable - the original one for Bravo won't fit.
8.) side mirror thread adapter - the master caliper that also holds the right side mirror has a small hole. The stock mirror's threaded end is a little bit larger. I was thinking of having it rebored or rethreaded and the adapter is quite a lucky find.
9.) disc pads
10.) front fender - it is cheap, the old one won't fit because of the hole placements.
11.) retaining clips or brackets - this is for the front fender. This thing clamps on the fork slider and holds the fender in place.
10.) front fender - it is cheap, the old one won't fit because of the hole placements.
11.) retaining clips or brackets - this is for the front fender. This thing clamps on the fork slider and holds the fender in place.
Whoa!!! I didn't realize that I bought all of those items above. Cash spent is about 4k Php. To recover some amount, I am thinking of selling the parts I removed from the bike.
Things to do :
1.) fix the handle bar - i sawed the metal that holds the right side mirror to give way for the brake master. Some grinding, filing, sanding and painting will be required.
2.) brake system overhaul - i have this feeling the brake is quite sticky. Some parts might be stuck.
3.) replace that brake hose
4.) tune the front forks - i am in the process of doing this at the moment. I found out that the ride is too harsh specially for an old man's back.
Related posts:
Monday, May 28, 2012
2012 Motorally
I was given this once in a lifetime chance to join the first ever Motorally last January 14, 2012. The invite came via Richard aka YBR1. He thought I am worthy enough to participate after joining the last two Manila-Matnog-Manila in 24hrs events. I wonder if he is reading this but I'd like to express my gratitude to him, nevertheless.
The ride will cover total of 1000 miles or roughly 1600 kilometers passing through several provinces of Northern Luzon as shown below.
![]() |
| 2012 Motorally Route |
![]() |
| Bravo and Me in Aparri |
Sunday, May 20, 2012
Log Periodic Antenna (2)
Part 2 (2011)
The objective actually was to have Channel 5 watchable since I am quite certain that Channel 2 and Channel 7 would still be clear even if I screw up with the antenna construction. I believe they have stronger transmission power compared to the other channels and besides, we still have the relayed channels which is very near (about 20-30 kms.) Unfortunately though, the towers are in the opposite direction ( south )
Continued in 2012
Today is May 21, 2012 and I can't remember when I wrote the above paragraph. Obviously, it has been a long time. In the spirit of trying to finish all unfinished posts, I'm gonna write the continuation today without pictures. Later on, I'm planning to review everything.
After several typhoons, the antenna is in a very bad state. Instead of being parallel to the ground, the front points downward. The channels from Manila are all gone suggesting a disconnect somewhere. We can only watch the relayed channels but even if the transmissions tower are nearer, the reception is still not good.
May 20, 2012, I got up early to fix the antenna. It is better to do this in the morning while it is not too hot. Rainy weather is coming and there's rain usually in the the afternoon.
I used magnet wire to connect the element for the simple reason that is quite easy to route. I know then that it was not proper way because I read somewhere that the thickness of the wire used as link affects the overall gain. The magnet wire was replaced with steel cable.
While removing the outer cover of the coaxial cable, I noticed that the insulator broke. About 0.25cm of plastic has separated itself from the rest. It seems like the insulator became brittle over time. I proceeded anyway and connected the cable to the antenna.
I pointed it North (Manila). Now the antenna is back in business with very clear receptions for stronger channels 2 and 7. Channels 4, 9, 11 are watchable although a bit noisy. There were also some UHF channels. But channel 5 which is why started this project is still a letdown with streaks that seem to flow from top to bottom. I wonder if it is caused by a mismatch or simply because the signal is just too weak.
Unable to fix the problem using the TVs fine tuning, I tried to find the optimum direction to point the antenna's front end. I used the coconut tree as the reference but I guess the tolerance is wide. The problem didn't go away. I was now beginning to suspect that something is amiss with the cable..
Fortunately, I have a spare coaxial cable. It is bit shorter compared to the one that is currently installed After making the connections, it is now confirmed that the old cable must be replaced. Channel 5 streaks are now gone and although there is some noise present in the picture which appears as white dots, this is way better and doesn't hurt the eyes as much.
Subscribe to:
Posts (Atom)


.jpg)